Sunday 31 July 2011

Hobbycraft and cat sitting

I'm house sitting in Woking for a couple of friends - they have 2 house cats and with Hobbycraft being so nearby how could I refuse to help them out for a few days!

I had a good rummage through the bargain boxes at Hobbycraft yesterday and found some glass/procelain paints at less than half price so can't wait to get to play with those once I am back home on Wednesday as I bulk ordered lots of white china items last week :).

A couple of the girlies joined me for a pizza last night whilst I was on cat sitting duties, but today I've been hanging out in the garden.  There are some lovely fuchsias and other plants that I don't know the name of - but some of the colours are absolutely beautiful. 

Here's where I got my inspiration for one of the cards that I made today - these are such a lovely shade of lilac.


And here's the card - I've almost matched the colour with the scraps of card that I punched the flowers out of.

The stamp is from the Creative Expressions U-Mount range which I have coloured with brush markets and shimmer pens.  The DSP used inside the oval is from the Papermania 'purple' Capsule Collection.

I realised after making this that there is very little space to actually write in it but hopefully the sparkle and bling will make up for that.

I've entered this into the Midnight Madness sketch challenge - 'your pick' and Totally Papercrafts - 'bling it up'.


Gift card holder

I thought I would share with you something a little different today.  I found this great tutorial for making this gift card on Dawn's Stamping Thoughts blog.


I've used papers from Bo Bunny for the outer cover and made a flower from the two step bird punch.  The insert is made from white shimmer card and I've used my Crop A Dile for the eyelets.  Diamantes and peel offs had to be incorporated somewhere too!

These gift card holders make giving a gift card slightly more personal rather than the standard card that comes with it.  I've entered this into the Dream Valley challenge - 'surprise'

Friday 29 July 2011

Camper

The good news is that I have internet access.  The bad news is I haven't got the craft stash out of my car yet as have just been out for a lovely Italian meal.  Plenty of time to make up for it tomorrow with the Hobbycraft sale :).  Here's a card I saved up with one of my favourite stamps which I've entered into the Here Come the Boys challenge - 'travel'

Thursday 28 July 2011

No sentiment

I've just been packing up some crafty bits to take with me tomorrow whilst I am house (cat) sitting for friends.  It's amazing how much stuff I can't leave behind; and I was trying to limit myself to some new ideas that I have been wanting to try for a while.

So, all packed up but as I wanted to enter the challenges below I still found enough stash in my favourite colour combination:

Creative Card Crew - 'animal antics'
Die Cut Dreams - 'animal antics'
Totally Gorguss - 'punch or die'
Stamping for the Weekend - 'paws for thought'
Promarkers Challenge - 'animal crackers'

I've stamped the Penny Black image onto white card stock and coloured with brush markers.  The flower punch used for the corners is the Martha Stewart Flower Patch punch.  The flowers looked a little too plain so I coloured them in so that they stand out against the green shimmer card that I've backed the image onto; after also colouring the edges with a lilac marker pen.

I always like to make my cards 3D so have raised the image up with sticky pads onto the dotty paper which is from Bo Bunny (and I've used the other side of the paper to stamp the parcels onto).  The whole thing was then mounted onto a lilac panel before adding it to the card blank.

I couldn't decide on whether it needed a sentiment, as it's quite busy with papers and flower I thought I would leave it as that.

Fingers cross I can get my pc working whilst I am away and can still post over the weekend as there is a whole load of challenges I am dying to enter :).

Wednesday 27 July 2011

Just because

Phew... finally I can get my life back in order as I don't have to work round the clock or at weekends anymore, or hopefully at least not for a while!

I went out for lunch today with a friend of mine, which really made me feel a bit more normal again... now I just need to go food shopping and get myself back to normal, although it's probably not worth it as I'm away all weekend.  However I'm only going to be down the road as will be house sitting for friends whilst they are away as they have three cats, two of which are house bound.  I'm quite looking forward to it as they live round the corner from Hobbycraft - what an incentive :).

I had to made a card super quick tonight as there was a big wasp buzzing around in my craft room which wouldn't go away - and I hate buzzy things :(!

There was no particular inspiration for this card at all, I just like the image and felt in an anniversary kind of mood! 

The image is from Lilly of the valley cute squares range.  I've added lavendar Stickles to the bow and stars to bring it to life a little.  The striped paper is from the latest Forever Friends male paper pack - the papers are great for non male cards too and I love the colours.

The buzzing has followed me... so must end this post as soon as I can find a challenge for this card :(... eek!

Craft us Crazy - 'anything goes'

Tuesday 26 July 2011

DIY

It was D-Day at work today (and I had to go to the office for a change!)... so I have only just got home, and have just had time to take a moment to enjoy all the lovely posts I have had today - thank you so much for your comments.

Unfortuantely I still have a lot of work to do before the morning but, fortunately I had saved up this post for a time like this ...

You think I would be sick of DIY after all the work that I (well, I had to project manage all the workmen and my dad didn't I!) had done on my house earlier this year.  However it's impossible to avoid making cards with a DIY theme as they seem to be a popular request.

This card has been covered with paper from the Daisy and Dandlion range by Docrafts - the spotted paper features in the Onion plays football decoupage pack (it's the elephant one in case you're unsure).  I've then mounted a cotton textured white panel onto dark green card which I have scalloped the bottom edge of; attached some orange ribbon around and personalised it with the initial of the recipient.

The image is from a Studiolight die cut decoupage sheet, which are often on special offer when I see them at craft fairs.  This company produces a great range of decoupage which suits allsorts of hobbies and the images are simple but effective.

I found some square brads in the same shade orange which I couldn't resist adding, but I don't think it takes away the masculine feel.

No time to find some suitable challenges for this one tonight so I've only entered it into the Lollipop Crafts challenge - 'anything goes'.

Back to normal tomorrow hopefully...

Monday 25 July 2011

Tatty Teddy

Just a quick post today as I have an early start tomorrow.

I have always loved the Tatty Teddy cards, so when they brought out a range of craft products with this little bear I thought it was great... and there are so many themes to choose from.  I think the decoupage sets are a bargain at around £3-4 for 4 sheets plus 4 backing papers - as you can make at least 8 cards, although I find the designs usually have extra layers which I tend to split into 2 toppers as otherwise you end up with postage issues as they are too thick!

I've stuck this baking teddy onto an easle style card and finished off with red diamantes for the cherries on the cupcakes.  The backing paper comes from buzzcraft, which is a bargain at a quid for a pack of 10 sheets.  I've stuck yellow diamantes onto the flower centres to add even more sparkle, although you can't really tell from the photo.

So here are some challenges I thought this might work for:

Fab N Funky - 'animal magic'
Sir Stampalot - 'anything goes'

Sunday 24 July 2011

70th birthday card

I've been busy planning my next big trip today, reading up all about Romania and the famous Bran Castle (also more commonly known as Dracula's Castle).  Planning trips always get me all psyched up and ready to go, but I can't even start packing yet as departure isn't until September. 

So back to the UK and a card I made last night.

My mum asked me to make a last minute bithday card for one of my parents friends, Ivan, apparently they had forgotten it was his 70th - just as well they have a daughter who makes cards :)!

The image is from I Brake for Stamps, which I saw on a card sometime ago and just loved the sentiment.  The papers are from the latest Forever Friends male range and I usually use the tiny tool charms for making wine glass charms but they seemed ideal to meet the sketch that I was following at Sweet Sketch Wednesday and Pixie Dust.

I hope Ivan finds the sentiment as funny as I did. 

I'm off to brave the gym now to get some exercise :)

Here are the other challenges that I've entered:

Totally Paper Crafts - 'one for the boys'
The Paper Shelter - 'green'
CES Challenge - 'humour/funny'
Secret Crafters - 'numbers'

Saturday 23 July 2011

Sketch attempt take 2

After yesterday's confusion with the Papercrafting Journey sketch challenge - 'go girly', I have made another card with a girly theme.  It's the same style (spring card) as my last post (see here) and I have used some leftover scraps of paper from one of the Papermania Capsule collection paper packs to mount the white panel.  I used the same paper for the top layer of the butterfly which is cut from a stencil created after using a die at a class earlier this week (see Thursdays post for the die cut butterfly).

The flowers are cut with a punch and the leaves from the two step bird punch, I use these flowers on lots of my cards as they are so simple and ideal for using up all those leftover pieces of card.  You can just see the diamantes in the centre of the butterfly and flowers, which co-ordinate with the purple colour theme. 
And of course, here are the other challenges I have entered:

Timeless Tuesday - I have been inspired by the colour of the seat cushions - 'purple'
Divas by Design - 'pastels'
Flutter By Wednesday - 'butterfly'
Craftroom - 'butterflies'

Friday 22 July 2011

Sketch attempt

I was totally inspired by the Papercrafting Journey challenge sketch and the Stamping B's Design Team challenge -'black, brown, ivory' this evening, but after making the card I realised that it was supposed to follow the sketch AND have a girly theme so I could only enter it for the latter one, so now I will have to make another card for the sketch :(.

The card is a spring card design (see the Splitcoasters tutorial that I used here) and the decoupage image is from Studiolight, I use their decoupage sheets quite a lot as they are ideal for hobby themed cards.  I used peel offs coloured with permanent pens on the corners and base and that great ribbon technique that I learnt last night at Cate's Big Shot class. 

Here are the other challenges I have entered:
Incy Wincy Designs - 'black, white plus 1 other'

Thursday 21 July 2011

Another class

My crafting addiction continued this evening, despite me saying I didn't have time for card making this week, as I went along to another of Cate's classes to play with a Big Shot machine...

Here are the beautiful cards and gift bag that we made, I love every one of them:

All these items are made from Stampin Up products which have co-ordinating colours and so much choice.  Everything is cut or embossed using the Big Shot machine which took me most of the evening to get the hang of, as I probably wasn't being forceful enough.  New gadgets are a bit daunting for me, particularly as I only bought myself a trimmer last month and had been cutting everything by hand before :(. 

I also learnt a new technique with ribbon, which you can just see on the green card.  And I now have a use for all my buttons, as have never been bothered with trying to tie thread through them before so have avoided using too many; just use a diamante instead!


Wednesday 20 July 2011

No baby yet

Still no sign of my friend Vicki's baby (check out the crafty things I made for her shower here if you're interested) which is due tomorrow... apparently another week according to the midwife whom she went to see today.  So no clues if it is a boy or a girl! 

I had a last minute order for a baby boy card for someone else which I thought I would share with you in an attempt to coax him/her out in the hope that Vicki doesn't have to suffer from boredom for too much longer... although if I was in her shoes I would be busy crafting and making the most of it lol!


For this card I've used another one of the Daisy and Dandelion characters from the Docrafts range.  This time a stamp which I have embossed this with clear embossing powder so it stands out and then coloured it with Promarkers.  The sentiment has also been embossed and I used my trusty Stamp-a-majig from Stampin Up so that I could stamp directly to the base card. 

A piece of white ribbon, some diamantes and some star shaped brads finishes this off nicely - not bad for a card that took about 10 minutes to make, although I have to admit to having stamped and coloured the image sometime ago.

Here are the challenges I have entered this one into:

Papertake Weekly - 'getting cute'
Everybody Art - 'dots'
I did it Creations - 'animals'
Cupcake - 'wish upon a star'
Deep Ocean - 'ribbons'

Tuesday 19 July 2011

Male theme again

Well, it's been one hell of a day today and the weather has been terrible, so much so that my roof is leaking again :(. 

I didn't get round to sharing with you yesterday that I was lucky enough to win one of the challenges that I entered at the weekend with cutedaisymay.  I was so excited when I read the result as this is the first challenge that I have ever won, although it was random... but I guess my luck was in yesterday!  The card I entered was  a very girly card (see it here) therefore I feel it is appropriate to continue with a male themed card to balance out my luck. 

This card is a twisted easle design which I saw in a magazine a few months back.  The stamp is from the It's a Mans World range from Papermania which I've coloured with brush markers and the papers came free with the Papercraft Inspirations magazine issue 87.  I have entered it into the Simon Says challenge - 'anything goes' mainly because they were trying to get their entries up to 1000, although by the time I had typed this post they have got to their target, but nevermind!

Monday 18 July 2011

Sorry

Happy monday!

Sorry, it's another bird punch card today - I just can't get enough of this punch!
I drew the bird house freehand and cut the roof out of wood grained card and the house out of textured paper which I then sponged with pale brown ink.

I've been keeping tabs on the birds in my garden using a bird spotting book (that came free with the Telegraph sometime ago) that my dad gave me.  The book is really handy for giving me ideas for different birds to make with my favourite punch... although I'm not convinced the blue tit on this card is actually distinguishable as one?

I used an embossing folder that came free with a Creativity magazine for the green paper and finished off with a brown ribbon.

Looks like I've posted this just in time to make this my second card entry at The Paper Shelter challenge - 'for the birds' and the Kaboodle Doodles challenge - 'embossing'.

Sunday 17 July 2011

As promised

As it's the weekend, and raining, I have so much time for crafting (yay!) so this is my second post of today!  As promised I have a male themed card to share with you.  In fact I have made quite a few male themed cards today... which I will save to share with you in the coming week, when no doubt my crafting time will be limited once again.
The backing paper used on this garden themed card is from the Forever Friends 'Just for Him' paper pack.  I have torn the green card used to mount the image, along with the red card that I have used as a 'ribbon'.  In order to fit this in with the 365 card challenge - 'tearing, piercing, painting' I have pierced (which is not very clear from the photo) the centre of the scalloped edges  of the green card and painted the peel off images with ink from my brush markers set.

It's amazing how many challenges there are to enter... it seems every card I make will fit into at least one, which is great because it means I get visitors... and lovely comments on my blog, which are greatly appreciated.

Here are the other challenges for this card:

Totally Gorguss - 'all about boys'
Crafty Creations - 'boyz to men'
Crafters Companion - 'one for the boys'

Lazy weekend

Despite the miserable weather I got out for lunch with a couple of friends on Saturday and then stopped by at a craft demo (lol!).  But it's been a very lazy weekend really, with plenty of time to craft so I'm happy... starting to think this is becoming an uncontrollable obsession?!  However I've caught up on my orders and have a pile of finished cards ready to package up so let's just call it business :).

I've trawled around the internet looking for some more challenges and there are quite a few with a girly theme - so I've entered the card below, with the promise of a more masculine card before the end of the weekend to balance things out.

I've used a Stamps Inc stamp with the message 'With the right accessories I can do anything' and layered it up with sticky pads.

The images on the right hand side were from a set of mini stamps by Clarity Stamps and have also been cut out and layered with sticky pads.

Here are the challenges that I've entered this into:

Totally Papercrafts - 'girly girls'
Creative Inspirations - 'no flowers allowed'
Southern Girls - 'happy birthday'
Less is More - 'circles'
Emerald Faeries - 'all things nice'
Cute Daisy May - 'we love pink'

Saturday 16 July 2011

It's that time of year

Just squeezing in the first one of the weekend.

It must be that time of year ... one of my friends has just got engaged although she is in Oz for the next 3 months!  I've had a number of wedding card orders recently... and there are plenty of card challenges with a wedding theme.

The last few days I've been entering lots of challenges as it's so lovely to get comments from visitors and it gives me lots of inspiration.  So here is a wedding card for a friend at work's brother which is based on the Stamptacular Sunday Sketch challenge.

I have gone with an easle card design as I think cards look so much more luxury standing up.  There are two tones of cream Colour Co-ordinations card and some gold shimmer card used for the panels. 

I have embossed the cream squares using a bouquet stamp and clear embossing powder, although the photo's don't really show this very well - you can just make out the diamantes that I have stuck onto each of the flowers.

The wedding couple stamp is from Hobby Art and one that I have had for years - it still gets a lot of use! 

I used a Stampasaurus template to draw round and cut out the scalloped ovals and mounted the name tag and main panel onto gold mirror card and have then used one of the petals of a flower punch on the corners.


The date panel was punched with a Martha Stewart punch and mounted onto gold mirror card and then fixed with sticky pads.

There are some co-ordinating diamantes stuck to the centre of the flowers and I've finished off the date panel with a gold butterfly peel off.

This card has also been entered into the following challenges:
Our Vintage Affair - 'wedding'
Stamp N Doodle - 'love and/or romance'
Simon Says - 'anything goes'

Friday 15 July 2011

More birds

TGIF, this week has been a battle at work and with constant toothache I'm a little grumpy around the edges.  However I have finally booked my op for 15th August which means only a month of this discomfort to sustain!

I have very little planned for the weekend for a change, which is a lovely thought as I can just relax and most importantly do some crafting... particularly as it's forecast to rain tomorrow.  So just a quick post this evening, and another bird punch card which I've entered into the Stampin for the weekend - 'wings and things' and Clear it out - 'wing it out' challenges. 

I needed a sympathy card for someone at work yesterday and thought I would make use of my favourite punch.

Keeping it very simple I have cut a window in the card base and mounted acetate on the back, then stuck a bird cage peel off over it.  The sentiment is also a peel off.

Despite it being so simple I really like this card...

I am going to try and use the punch to create some other things too so check back soon for more ideas.

Thursday 14 July 2011

Wisdom teeth

I have been tormented by my wisdom teeth significantly the last few days!  Having finally agree to have one out after about 3 years of putting it off... it seems it has decided to make it's mark and bully me in the run up to the op!

So the most appropriate card idea that I can come up with to link in with that (!), and to enter into a few more challenges (it's so touching when people visit and post comments), is of course a get well card...

I saw the idea for this card ages ago when searching on the internet for something a bit different.  There are numerous blogs with videos as well as full instructions and measurements for making this type of card in a variety of sizes.  I love the fact that the flowers come out of the pot and you can write a message on the insert which fits nicely back into the pot afterwards.

I cut the flowers out with scissors after drawing round a template leftover from some pre cut flowers that came with a sample set I bought from a craft show, nothing gets thrown away!  The flower centres are just Candi pieces by Craftworks.  Note to self - I must get some more of these as they are just so versatile.

The scalloped edge of the flowerpot was punched using the Tonic punch system having cut the initial shape first with a trimmer.  Once folded I decided to use a touch of glue to hold it together as well as the ribbon, although a lot of the designs that I have seen for this type of card don't use glue at all.

I realised after I had put a sentiment on the front that I was meant to be making a get well card - oops!  It obviously felt more like a thank you card, so I made a get well one as well in a different colour.

It just goes to show that this card is ideal for lots of occasions.  It looks like a lot of work but once you know the basic measurements it's easy to get a production line going. 

Most importantly this card is suitable to enter into a number of challenges, albeit my cards seem a little more simple than some of the extravagant ones that I see entered... however hopefully it improve my site visitors :). 


Here are the challenges:

Creative Craft Challenges - 'pretty blossoms'
Bloggers Challenge Floral Frenzy Challenge - 'floral frenzy'
Secret Crafter - 'get well soon'
Scrapbook Sisters - 'thank you'
Simon Says - 'anything goes!'

Wednesday 13 July 2011

Bird punching

Having recently attended some card making classes in Ash run by Cate I have been getting into the world of Stampin up products.  I would love to have a home party and get some of my friends into card making, but if I'm realistic it's probably best I stick to making and selling them cards instead as they all tell me they aren't very creative etc etc.

Anyway, my first lot of purchases included a two step bird punch, which I have been playing with to my hearts content, coming up with allsort of ideas, some of which I have to admit to having cased from the internet. 

My favourite has to be the card that I made for a friend to give to his wife for their anniversary.

I saw something similar whilst searching through the internet for ideas but it turned out to be quite hard to get all the leaves intertwined together in a heart shape. 

It turns out this is also ideal for my first ever entry into a card making challenge The Fuzzy Wuzzy challenge - 'get punchy'.
The bird punch can be used to create allsorts of other things, not just the basic shapes in their raw form.  More ideas to follow another day... I'm off to search for more challenges I can enter ;).

More challenges I have entered:

The Poodles Parlour - 'birds eye view'
My time to craft - 'bird watcher'
Stampsruschallengers - 'through the garden gate'
Pollycraft - 'the great outdoors'
The Paper Shelter - 'for the birds'
Paperpretties - 'animals'
Simon Says - 'anything goes'

Tuesday 12 July 2011

Baby shower ideas

I've managed to keep the posts going for consecutive days so far.  Didn't want to break the trend so have saved this one up to fill in the gap that is anticipated today...

Last month I had a baby shower at my house for one of my friends.  She isn't one to enjoy being the centre of attention so we tried to keep it low key.  A few of use got together on the organising and divided up what needed doing and the food etc.  Of course I jumped at the chance to get crafting but tried not to get carried away. 

The invites were made using one of the characters from the Daisy and Dandelion range from Docrafts.  As we didn't know if it was a boy or a girl the colour theme had to be gender neutral and the mum to be likes purple... so it was an easy them to work with, also being my favourite colour.

I layered up the hedgehog and then found some suitable papers (Fizzy Moon and sticky backed glitter) and embellishments to finish it off.


Instead of goody bags for everyone to take home afterwards I came up with the idea of having personalised wine glasses, which could be used during the shower and then taken home as a memento.  I had to keep these fairly simple though as I've only recently got into the glass painting thing so went with a butterfly theme.
I also painted a ceramic bowl and mug set with the same butterfly theme for the equivalent of a guest book that everyone could write a short message for the baby onto.


Whilst I was busying myself painting things, the other girls worked on the game ideas. 

We had a Mr and Mrs type quiz where the dad to be had to answer some baby related questions which were then used in a multiple choice quiz for the mum to be with prizes for right answers and prizes for the rest of us for wrong answers.

Everyone who attended had to provide a baby and toddler photo of themselves beforehand, which was then used for a guess the baby game.  I actually found this quite hard, despite there being only 8 of us to guess... however once you knew the answers it was obvious who was who!

Finally, a sweep stake was in order... although we have yet to find out if it's a boy or a girl, I did manage to extract a number of potential baby names and I couldn't resist making some cute ATC type cards with each of these on.  I used a Tatty Teddy clear stamp that came free with a Creativity magazine for these as the baby's nursery has a teddy theme.  The name tags were cut using a mini punch and as the doodle writing turned out so well, I braved using the same freehand on the glasses, bowl and mug.


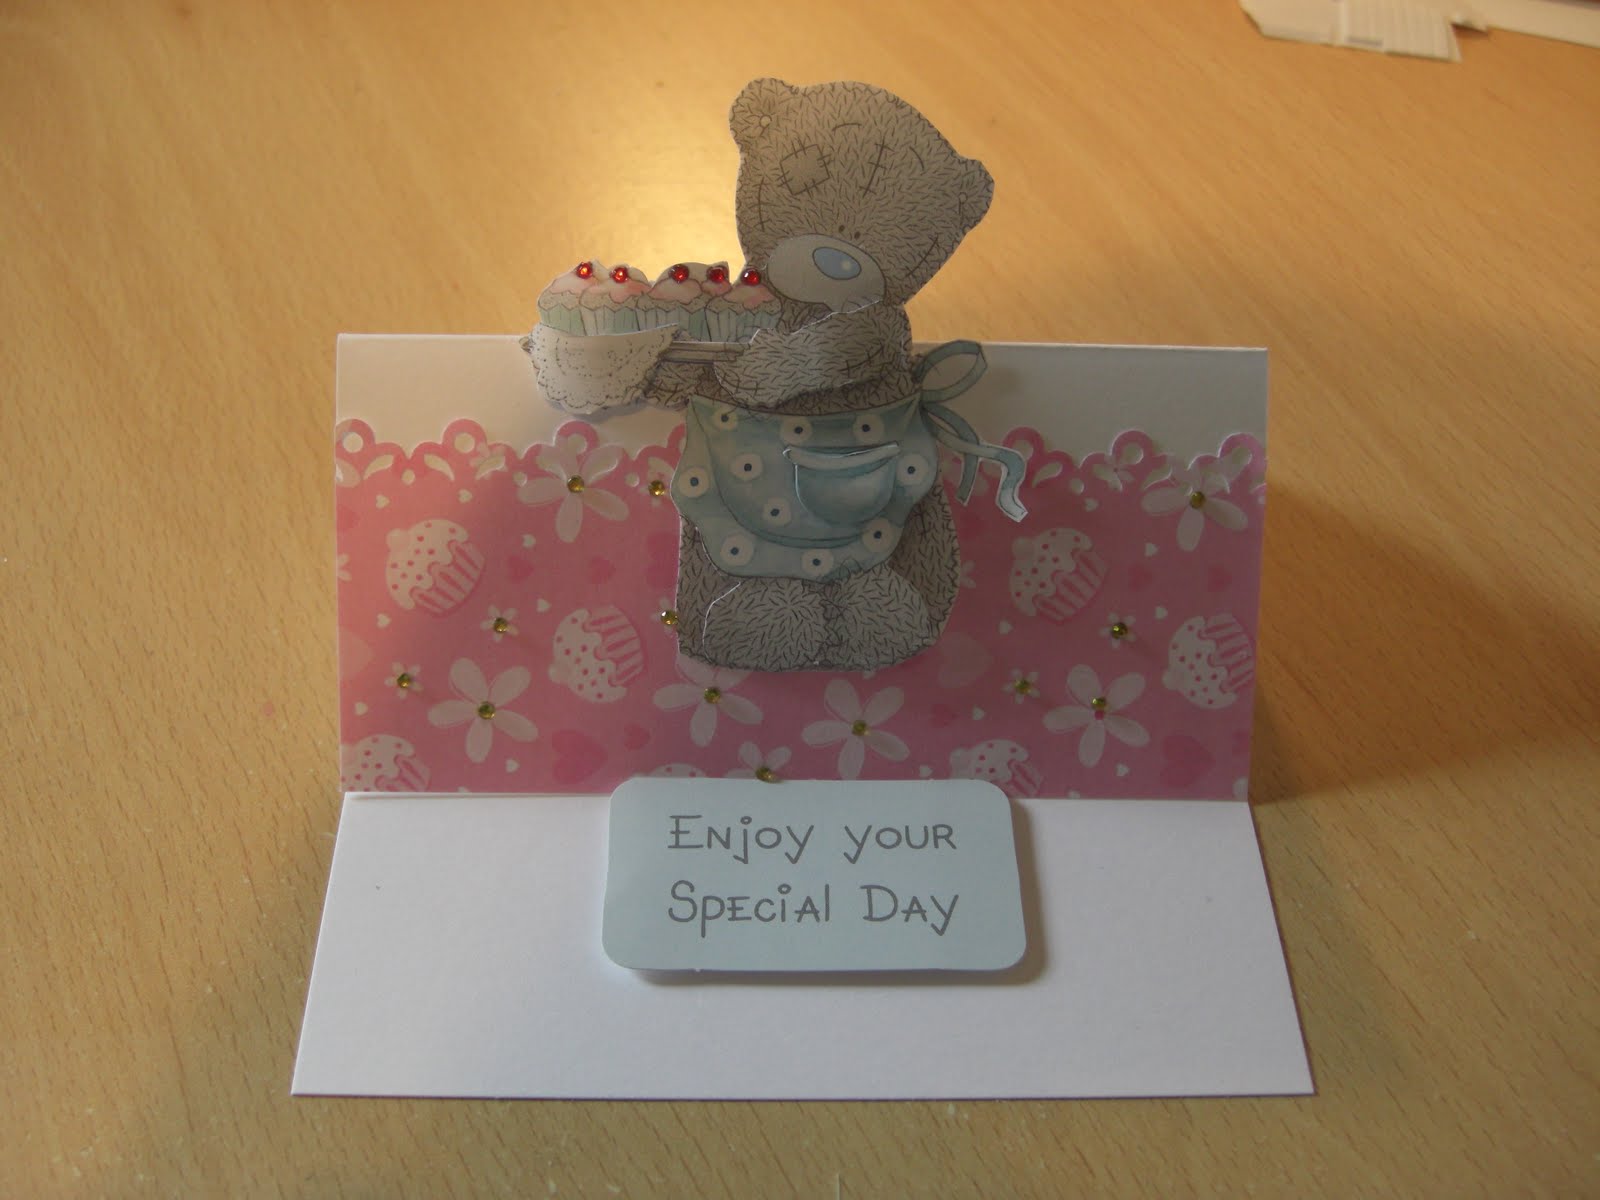
Of course I had to make a tag for the present and a card for the parents to be.  For the card, I used the same papers and colour theme as I did for the invites.  The picture panel is cut out from Fizzy Moon papers which are absolutely adorable and include the cute bears in poses suitable for all sorts of occasions. 

I had so much fun organising everything, and it's so lovely to get some use out of my lovely house and have people round.  The hardest part was restraining myself from coming up with more ideas for making more bits and pieces...

Monday 11 July 2011

Throw nothing away

I hate Mondays!  It feels like I have been dealing with one problem after another today... however, escaping to the craft room for the evening inevitably takes the pain away :).

Why is it that after a big tidy up I end up making more mess?  I'm not a hoarder (honest!), but I do like to keep leftover wrapping paper, bits of ribbon/string and anything that I can use for crafting with.

Having had a couple of parties recently I seem to have acquired quite a lot of wrapping paper so in my attempt to clear up I found the perfect use for some of it... as backing paper. 


The card is A6 in size and I have cut out a panel of wrapping paper and mounted it on some pink card and finished it off with a piece of ribbon before adding the panel which features one of the characters from the Daisy and Dandelion range by Docrafts, which was released last year. 

The hedgehog is from a decoupage pack which has lasted ages, despite me using this cute hedgehog on a number of other cards.  There were also some great papers in the pack, in complimentary colours, which I found were suitable to use on masculine cards as well as the more girly ones.  Usually with decoupage packs I find there is too much in there that doesn't get used, but I have used every image at least once and with 2 sheets of each set of designs and a photocopier (!) the cards are endless (literally!).

Sunday 10 July 2011

Entertaining

Since the house renovations have been finished I've being finding as many opportunities as possible to have people round.  Mainly with a BBQ as it doesn't involve much preparation and with the possibility of some warm weather this is the time of year to make the most of it.  However, today for a change I went to friends for a BBQ instead, the food was wonderful and the rain held off which was a bonus.

So, I wanted to share with you a great idea for when entertaining  - wine glass charms. 

You put them round the stem of a wine glass and that way everyone knows which glass is theirs, they just have to look out for the individual charm hanging from the bottom.  There are endless ideas for party themes that could be incorporated into these!

Obviously they are not something I have invented myself but everyone who has seen them thinks they're a brilliant idea and few people seem to have their own.  There is a commercial opportunity here ... and it's all come about from making my own set :).

I have used a variety of tibetan charms which are ideal for making these.  I've already had a couple of orders from friends for their very own sets which I've sold in a little gift bag which included a decorative panel that the charms are attached to. 

I'm working on a few more themes for these and also a gift box with giftcard, which will be perfect for presents.

Saturday 9 July 2011

Rugby

I've just spent a large part of my day watching rugby... My sister works with the GB Wheelchair Rugby team and the the GBWR Super Series is taking place this weekend in Guildford.  It was actually quite good and it looks like her team (Crash) won their group and will be in the finals tomorrow.

Despite this, I of course still managed to fit in a visit to the craft demo earlier this morning although as expected I was a little disappointed with the large number of Christmas cards that were being demonstrated. 

So, instead of casing any of those ideas, I thought I would share with you a card from my current batch of orders.  This Art Deco card features my most used stamp set (by Clarity Stamps) which I picked up at the first craft fair I ever went to, about 3 or 4 years ago!

People are quite happy to buy this card from me in the standard purple or green colours that feature in my catalogue although being such a versatile stamp it can be made in any colour and for any female, for any occasion.

Someone even bought this card to give to a close friend, whom she had given the same card to last year for their birthday, albeit in a different colour!

The image has been coloured with brush markers, cut out and stuck on with sticky pads.  I used the Border Punch system by Tonic with a ribbon punch on the edge of the card and threaded through ribbon to match the backing paper which has been mounted on card cut with scalloped scissors. 

It always seems to take me ages to colour these images in as I like to make them sparkly with gel pens, but I often stamp lots of them in one go as I'm guaranteed to be able to sell these cards quite quickly.

Friday 8 July 2011

Take That

My parents are visiting with a couple of friends today... well, they are visiting Hampton Court Flower Show and are making use of my spare rooms. 

I am slowly getting into this blogging malarky, especially as I can do it whilst on the go.  I am just on the train on my way to see Take That at Wembley, and it seems I am not the only one.  The weather hasn't been the best with periodic showers all day... the pitch area might be a little damp me thinks, fingers crossed we can find some undercover area to stand if there is a downpour.

I've set up blogger to release this post automatically whilst I am at the concert ... how cool is that?  Crafting whilst on the move :).

Let's hope it works, here goes...

A summery card for a not so summery day.  I've used mostly items from the Craftworks range.  The image has been coloured with brush markers and then made a bit sparkly by using star dust gel pens.

I just love the candy pieces that Craftworks sell, they look like large brads but don't involve having to make holes and therefore avoid the metal split pins that brads leave showing on the back.

There's a craft demo in Frimley tomorrow, so I'm hoping to squeeze in a visit in the morning to check out the new Christmas ranges from Docrafts - although it is far far far too early to start thinking about Christmas cards!

Thursday 7 July 2011

Girly pink and diamantés

I thought it about time to join the world of blogging so that I can share some of my crafting inspiration with anyone who is interested.  It's going to take me a while to get it a little more user friendly - I'm struggling with the colour theme which isn't a good start, but nevermind, I'm sure it will all fall into place when I have a little more time to work it all out.

I've been getting behind with the card orders lately, what with work and everything else that has been keeping me busy.  Not that I am complaining as I'm glad that my weekends seem to be keeping reasonably filled with a nice variety of things.
However, it was a couple of girly friends birthdays this week so I created two very different cards using girly pinks and diamantés for each of them.  They are made from the same size scalloped square card blanks (15 x 15).

The first featured a scottie dog from the Pampered Pets range of mini clear stamps.  The fiddly bit was cutting out his jacket which I had stamped onto the same paper that I used for the side panel and then sticking a few diamantés on it.

The second card had to incorporate shoes so I used a template I found in a Papercraft magazine for the shoe and went crazy with the diamante's.  The stamp is an old wooden mounted one that I picked up in a reject bin years ago but one which gets a lot of use. 

As always I made 2 of each card, the recipients seemed to like them... so hopefully someone else will buy one.